
Capitalized letters are useful when they’re used properly, but they’re not AS CONVENIENT WHEN YOU’RE FORCED TO USE THEM THROUGHOUT THE ENTIRE SENTENCE. Sometimes, a computer will continue typing in caps lock long after caps lock has been disabled or the shift key has been released.
Why is that? While there are several possible causes, a few of them seem to happen more frequently than others. Depending on if the issue is bound to a certain application, such as Word, or if it happens everywhere in Windows, the reason behind it may differ, but also the method used to solve it.
We’ve gathered the methods for you! We hope this guide fixes your problem!
11 Ways To Fix Keyboard That Doesn’t Turn Off Caps Lock
Down below is a list of applicable methods that can be used to solve the problem. After trying a method, make sure to check if the problem persists before proceeding to the next solution. We don’t want you to make changes that you might not need to make.
1. Change font in Microsoft Word
If your keyboard only types in caps lock when you’re in Microsoft Word, or another text editing program, then it’s most likely the application that’s causing the problem. In Word, we know that there’s a function that frequently causes this problem. Thankfully, it’s rather easy to fix.
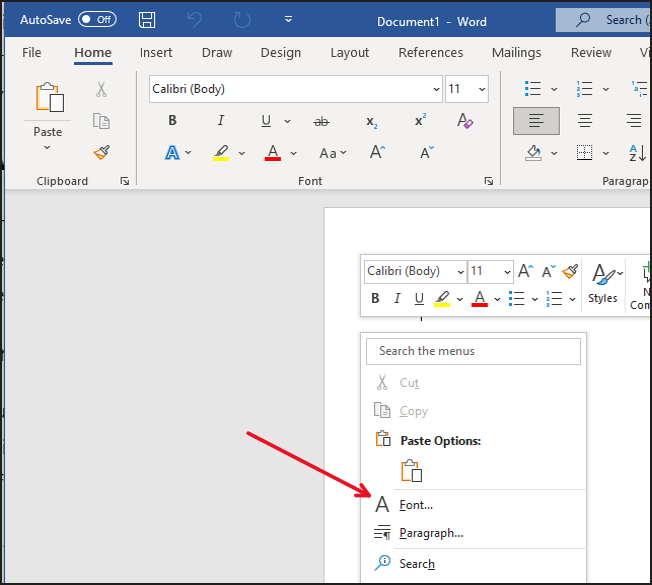
Step 1: Open a Word document and right-click on the document’s background.
Step 2: Go to Font.
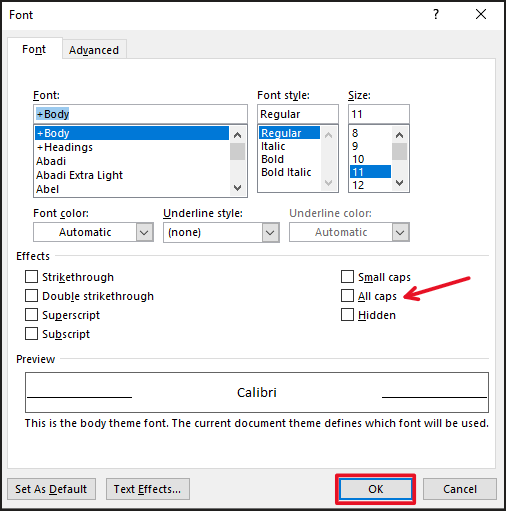
Step 3: Uncheck the box labeled All Caps and make sure none of the boxes next to it are checked either.
Step 4: Press Ok.
Done!
2. Make sure none of the shift keys are stuck
Every now and then, the keys on your keyboard will get stuck in the pushed-down position, unable to release. In that position, the key is constantly sending commands to the computer. If this key happens to be the shift key, then your computer will command the computer to capitalize all letters.
Inspect the keyboard and make sure the keys can be pressed down with ease and that they’re brought up automatically as soon as you stop forcing them down. If not, clean your keyboard and remove any object that might hinder the keys from coming up.
3. Turn off Filter Keys, Sticky Keys, and Toggle Keys
Windows comes with features for your keyboard, and they’re all different. However, sometimes these functions can cause interference. Because they impact the way the keyboard responds to your input, they can sometimes can confusion for someone who isn’t used to having them activated.
Disable every one of them to see if the issue still persists. Here’s how.
Step 1: Right-click the start menu in the lower-left corner.
Step 2: Select Settings.
Step 3: Go to Ease of Access.
Step 4: Select Keyboard in the menu on the left-hand side.
Step 5: Toggle off the Sticky, Filter, and Toggle keys functions.
Step 6: Try typing to see if it’s still in caps.
4. Reverse the caps lock button in Word (CTRL + SHIFT + CAPS LOCK)
By accidentally pressing Ctrl + Shift + Caps Lock on your keyboard in Microsoft Word you may have reversed the caps lock button. This means that you will type capital letters when the caps lock button isn’t activated, but not when it is. Try pressing Ctrl + Shift + Caps Lock again to see if the problem is fixed.
5. Try on-screen keyboard
To determine if your keyboard is going haywire or if the problem is within the software, it can be wise to use an alternative keyboard. The on-screen keyboard will tell you if there’s something going on that seems off.
If the OSK can type letters that aren’t capitalized, then there’s a possibility that there’s something wrong with the keyboard (but it doesn’t have to be an indicator that it’s broken). If the issue persists, then it’s safe to say that the issue is software related.
To start the OSK:
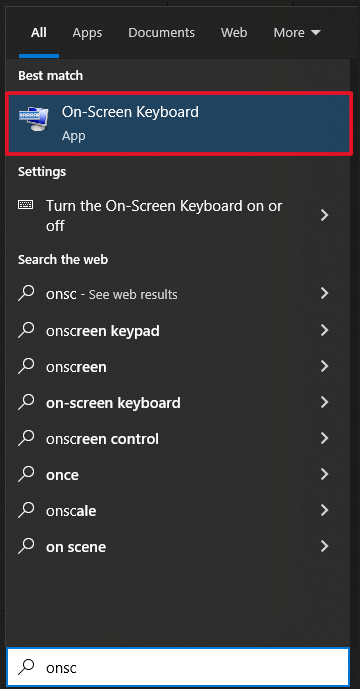
Step 1: Type on-screen keyboard in the search bar in the lower-left corner of Windows.
Step 2: Select the On-screen keyboard.
Step 3: Type something using the On-screen Keyboard to see if it’s in caps or not. Try pressing the caps lock key on your physical keyboard and on the OSK to see if any changes are made.
Alternatively: If you’ve got two physical keyboards at your disposal, connect the second one to see if it’s able to produce lower-case letters.
6. Press both Shift keys at the same time
Holding both Shift keys at the same time for a few seconds can reverse the issue. When both Shift Keys are held simultaneously, something called ghosting occurs.
When ghosting (or masking) is activated, only a pre-determined set of letters can be used. For the rest of the keys, the input is not registered by the computer, meaning no letter will be produced when a key is pressed.
This has to do with the way keyboards are wired. It’s basically a by-product of the way keyboards are engineered.
Additionally, a feature called Sticky Keys can be turned off by pressing both Shift keys simultaneously. The keys can, however, only be used to disable the feature, not vice-versa. With that said, we recommend you try it for yourself to see if it produces the results you wish for.
Step 1: Hold both the left and right Shift Keys for a few seconds.
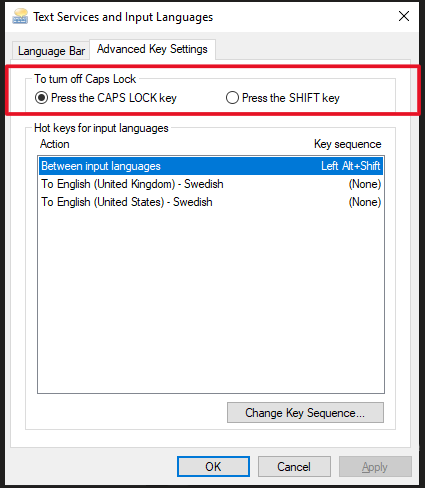
7. Check advanced key settings
In advanced key settings, the caps lock key can be configured. Perhaps something has gone wrong there? It’s worth taking a look.
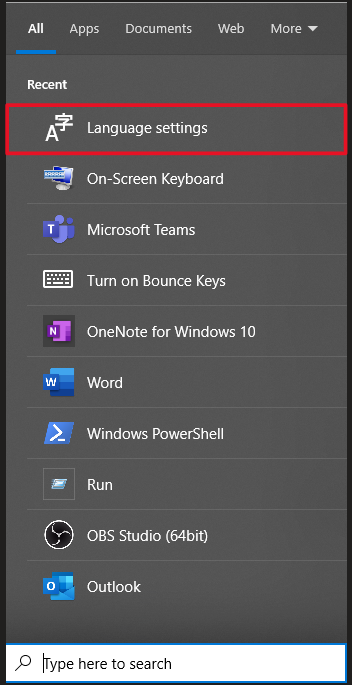
Step 1: Search for Language settings using the search bar and click it.
Step 2: Select Spelling, typing, & keyboard settings on the right-hand side of the screen.

Step 3: Click Advanced keyboard settings.

Step 4: Go to Language bar options.
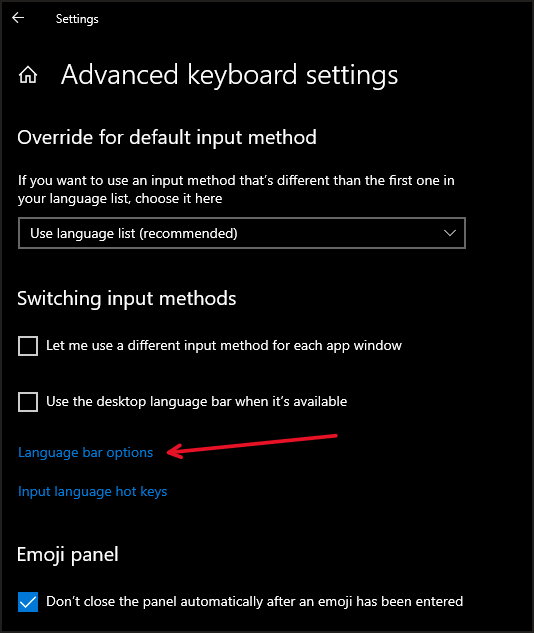
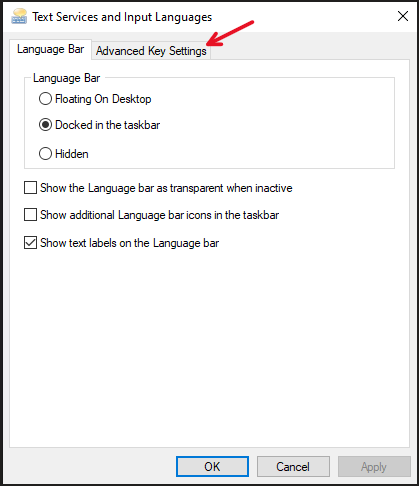
Step 5: Go to the tab labeled Advanced Key Settings.
Step 6: Check if the caps lock key actually is the key used to turn off caps lock, or if it has been changed to the Shift key. If “Press the SHIFT key” is checked, change it to “Press the CAPS LOCK key” and press OK.
8. Reinstall keyboard drivers
You might need to reinstall the keyboard’s drivers in order for the keyboard to function as intended. Thankfully, doing so is quite easy. Below is a simple guide.
Step 1: Right-click the start menu in the lower-left corner of Windows.
Step 2: Select Device Manager.
Step 3: Expand the object “Keyboard” in the list by clicking the arrow to the left of it.
Step 4: In the list of items that appeared under Keyboard, right-click your keyboard and select Uninstall Device.
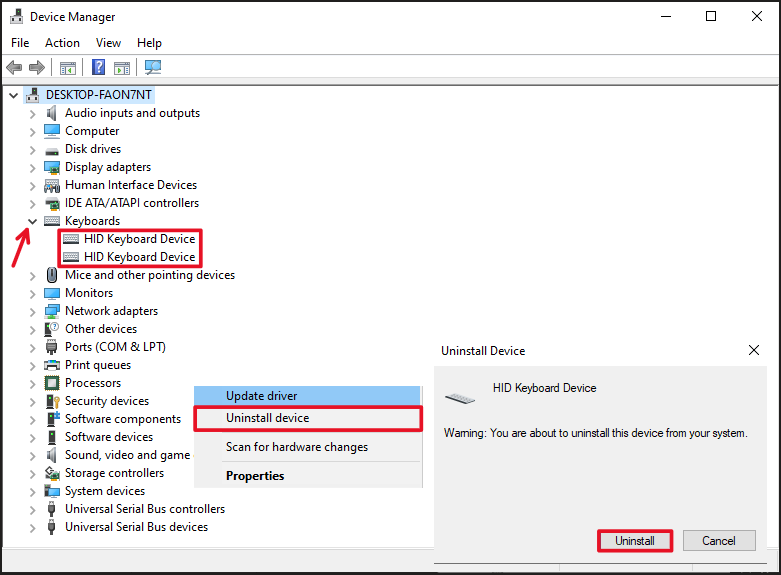
Step 5: In the subsequent dialogue window, press Uninstall.
Step 6: Restart your computer. The drivers will be reinstalled as the computer starts up again.
9. Replace the keyboard’s batteries.
Wireless keyboards can start acting up when they’re low on battery. While it should be mentioned that we haven’t had many reports of keyboards typing in all-caps when the keyboard is low on battery, I would still consider it worth trying.
We’ve been able to fix keyboards going haywire by simply charging them or replacing their batteries before.
10. Update BIOS
Your computer’s motherboard uses something called a basic input/output system, or BIOS, to communicate with the hardware connected to it (among other things). Whenever the firmware hasn’t been updated in a long time, components can start to glitch.
Updating to the most recent version of BIOS can do wonders for your computer. To find and install the most recent version available for your computer – follow the guide below.
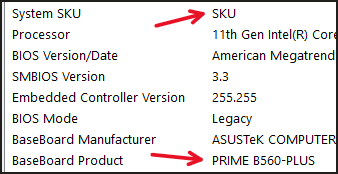
Step 1: Go to System Information and look for the information given in the BaseBoard Product or SKU rows.
Step 2: Now that we know the model or product name, go to the manufacturer’s website and find the product page for your specific product (laptop model or motherboard model).
Step 3: Find drivers on the product page. Sometimes, they can be found in sections like Support, Drivers, or Firmware. Once you’ve found the drivers section, look for the most recent BIOS version for your product and download it.
Step 4: Open the file that was downloaded and follow the installation wizard. Make sure your computer is connected to a power source. If the computer dies during the installation the firmware could become corrupt. The computer will restart a couple of times during the update.
Step 5: You are done when the computer starts and stays on the login screen or start screen.
11. Run a virus scan
Certain types of malware have the power to govern (or impact) how the computer’s peripherals, such as the keyboard and mouse, behave. This could be what’s causing your keyboard to type in all caps. If nothing else on this list has worked, I suggest you run a virus scan to see if any threats are found on your computer.
Windows 10 has an in-built safety system known as Windows Defender, from there you can run a full virus scan. Here’s how you do it.
Step 1: Right-click the Windows symbol (Start menu) in the lower-left corner.
Step 2: Click Settings
Step 3: Go to Update & Security
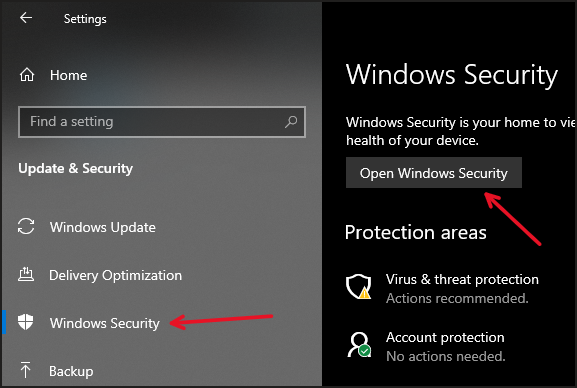
Step 4: Select Windows Security in the menu to the left then click Open Windows Security.
Step 5: Click Virus & Threat Protection in the menu to the left.

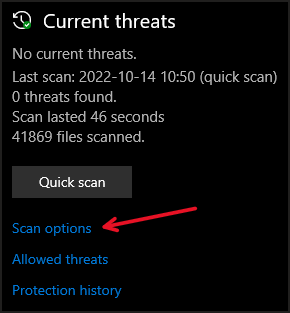
Step 6: Click Scan Options and select Full Scan then click Scan Now.
Step 7: Remove any unwanted files that the scan may have detected. Restart your computer to see if the problem has been solved.