
Has your mouse wheel started behaving strangely? Are you not able to scroll up and down the displayed page on the computer with the help of the mouse wheel no more?
Has the mouse wheel function started to change the system’s volume instead? Regardless of what’s causing your scroll to act out of the ordinary, you’re not the first one to experience it and you’re not going to be the last one either.
Thankfully, you’re in capable hands as I’ve seen a bunch of users who have struggled with this issue before, and we’ve been able to resolve it the majority of the time. So, what’s causing it, and what can be done about it?
There could be several different things causing your mouse wheel to adjust the volume in place of scrolling.
Your scroll is adjusting the volume because the mouse is in media mode or the drivers are outdated or corrupt. Disabling media mode and updating or uninstalling the drivers could fix the issue. Replacing the device’s batteries, changing the device’s settings in the control panel, and uninstalling conflicting software are also common fixes.
This issue is quite frustrating and it really highlights the importance and convenience of a working scroll wheel. Not being able to use the wheel as it was intended to will have you looking for a fix as quickly as possible.
How Do I Stop My Mouse Scroll From Changing the Volume?
Follow the steps below, one by one, and your mouse should (hopefully) start working normally again.
Disable Media Mode
Depending on the type of mouse you’re using, it may or may not come with an array of convenient features. Regular mice don’t come with anything else than the standard set of buttons and the scroll wheel, while more advanced mice come with the ability to switch between user profiles, plenty of customization options, media mode, and more.
The feature known as media mode can turn out to be the reason you’re experiencing interference. Mice with media mode enabled will, by default, have a button that lets the user turn the feature on and off.
When media mode is activated, the mouse can be used to control media, just like the media buttons on a keyboard. It’s not unusual for the mouse wheel to be bound to the system volume while in media mode – and that’s probably what you’re experiencing if you’re the owner of a more advanced device.
Turning media mode off should reverse the effect. The mouse should go back to normal and all buttons, keys, and wheels should once again be bound to their initial function.
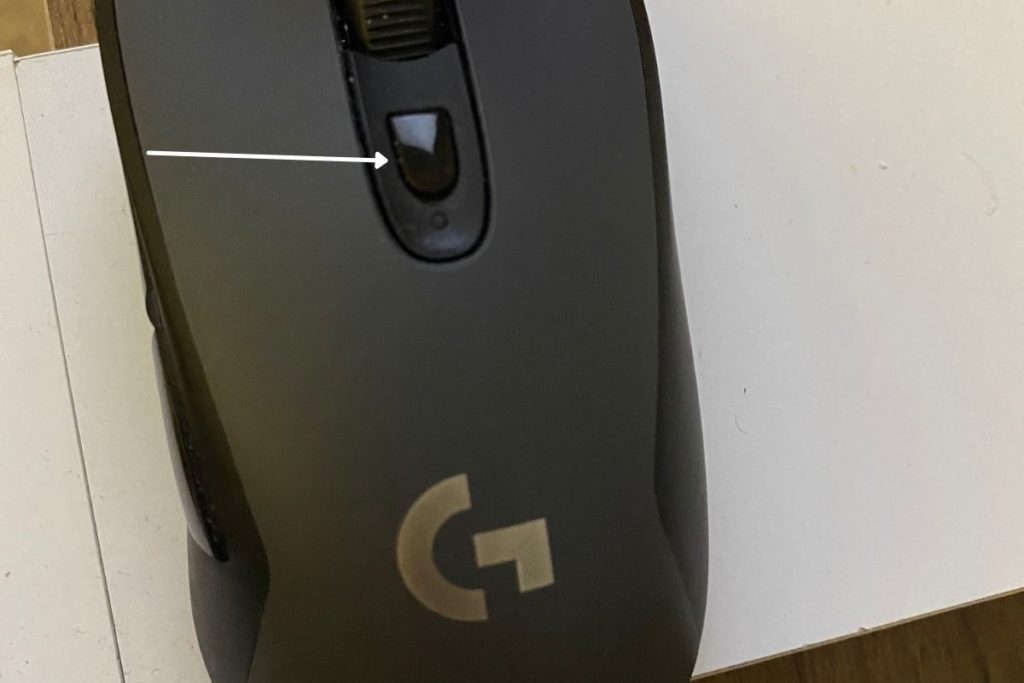
- Inspect your device to locate the Media Mode Button or DPI switch
- Click or hold the DPI button for 3 seconds to disable Media Mode
- Test if the scroll wheel works as intended
- If the issue should persist – hold the DPI button for five seconds to ensure that Media Mode actually is disabled.
Uninstall / Update Drivers
Updating or uninstalling the device’s drivers is a common fix for a bunch of different issues. This is not only true for mice, but for all of the computer’s components.
Uninstalling the drivers will force the computer to reinstall them as you turn on the computer. The newly installed version of the drivers isn’t necessarily the most recent one – but it’s a fresh installation.
Sometimes it’s much better to update the device’s drivers rather than uninstalling them. The most recent version of the drivers will include fixes for the previous version’s bugs along with optimizing features.
Ok. Let’s take a look at how it’s done.
- Right-click the Windows-menu in the bottom-left corner.
- Select Device Manager
- Look for x in the list of item and expand it
- Right-click the device that’s causing the issue
- Select Uninstall device
- Select Uninstall (If the window has a box that can be checked – check it)
Change the Mouse’s Settings
The issue could be caused by a glitch in the settings within Windows 10. Changing the settings can resolve the issue. The mouse wheel’s settings can be found by going to the mouse settings then going to additional settings. I’ll walk you through it.
- Click Windows + I to open Window Settings. You can also right-click the bottom-left menu button and select Settings
- Select Devices
- Pick Mouse from the list to the left
- Select Additional mouse options on the right-hand side
- Click the Wheel tab in the Mouse Properties window
- In the Vertical Scrolling section, check the box for One screen at a time.
- If the box was already checked, change the number of lines at a time to 3.
- Apply the changes and see if the issue persist.
Remove Conflicting Applications
Have you installed any new applications recently? Backtracking and keeping note of any software you may have installed on your computer around the time the issue started is smart because there are applications out there that tend to interfere with the mouse’s functions.
The easiest way to tell if you have conflicting applications installed on your computer is to clean boot your computer. What clean boot does is that it allows you to start Windows without any additional applications, only the default programs.
If the mouse scroll adjusts the display, and not the volume, when clean booted, then it’s leaning towards one of the applications being the cause of the problem.
Enable the applications one by one until you’ve found the culprit. Now that you’ve found the specific app that’s interfering with the mouse, either disable or uninstall the application.
It’s also wise to use Google to gather information regarding the application and to see if others have experienced the same problem.
Applications that I know of that might have an impact on the scroll wheel are the following:
- KatMouse
- AltDrag
- DesktopOK
- WizMouse
- Taekwindow
- Logitech’s SetPoint software
To uninstall an application:
- Right-click the Windows menu and select Settings or use the command Windows-key + I to access Settings.
- Go to Apps
- Select the application you wish to uninstall
- Click uninstall
Re-insert the Batteries
Disconnecting the mouse from the computer or removing the batteries can fix glitches in the mouse driver. It’s possible that your mouse starts working as intended once it’s reconnected. Small temporary glitches like this one can often be fixed out of the blue – by restarting the computer or the device in question.
Wireless
- Open up the hatch containing the device’s batteries
- Remove the batteries
- Re-insert the batteries after 3-5 minutes and turn on the device
- Place the hatch back on
Does it work? If not – try the same thing using a pair of fresh batteries.
Wired
- Disconnect the device from the computer
- Reconnect the mouse after 3-5 minutes
Connect your mouse to another computer
Connecting your mouse to another computer is an easy way to tell if the issue is hardware or software-related. If the mouse functions properly on another system, then you can conclude hardware being the problem. Knowing that the issue doesn’t appear on a second system makes it easier to troubleshoot the device.
Remap the mouse buttons using 3rd party applications
You can remap the mouse buttons to specific functions using third-party applications. Remapping the wheel should bind the wheel to its initial function once again. I recommend using X-Mouse Button Control for this.
Reinstall Windows
If nothing else works and the problem doesn’t seem to be the device itself, but rather the settings within Windows, then you could go as far as reinstalling the computer’s operative system. While this is quite a stretch, it could be a solution if all else fails.